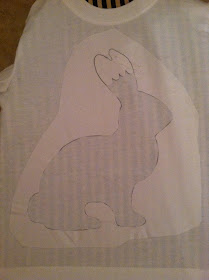
1. Get a shirt you want to use. A plain, solid colored one works the best. You can wash it first, but you don't have to.
2. Print or draw out the image you want to use. I just Googled "Easter Bunny Silhouette".
3. Then you are going to trace it onto freezer paper. You can buy a huge roll of it at the grocery store for a couple of dollars. Its in the cooking isle/baking needs isle. Its in a type of roll you would see aluminum foil in.
You need to trace on the non-waxy side. Its important. The waxy side will be ironed onto the shirt.
To make the bitten-off-ears part, just make little waves halfway down the ears. See? Pretty easy so far.
4. Then you need to cut out the shape. Anything cut out will be painted. So you would only cut what you want to be painted.
5. Iron it, waxy side down on low heat to the shirt. Don't worry, the paper won't catch on fire. Just don't press too hard and don't leave it on one spot for too long. Go around the design, making sure the seams are stuck down to the shirt really good.
You will need paint and a paintbrush. I use Tulip Soft Matte fabric paint, and a disposable paintbrush.
6. Paint the design on, making sure to not get any paint under the seams. Make an even coat, and do not put too much on. Start with putting paint onto a plate, not just directly onto the shirt. Please remember to put a piece of cardboard under the shirt to make it tight. Also it will stop the paint from bleeding onto the back of the shirt. Do at least two coats, making sure the first coat is dry before doing the second.
Wait for it to dry, or use a hairdryer. Once you feel all around and are sure its dry, carefully peel the freezer paper off the shirt.
It should look something like this. Minus the little bit of paint I accidentally spilled on the shirt. Drat.
So now I have to fix the spot. Remember, once the paint is on, its super hard to get off. So I decided to do my nephew Brayden's name at the bottom. Not planned, but easy to do.
I just drew his name in thick letter onto the leftover scraps of freezer paper. Then you need to add the "Ouch" to add the laugh factor. Trace, or free hand like I did onto freezer paper. Don't forget to save the circles that go in the letters. You will iron them on.
Now the paint mark is covered. Then I added the holes for the B, A, and O. Iron them on.
7. Paint once more. Use two coats if you have to. Once its dry peel the paper off, not forgetting about the circles in the B, A, and O.
8. Lastly you will need to heat set the paint so its permanent. With your iron on cotton, grab a washcloth or towel and place it over the painted design. Then just iron it, making sure you are moving the iron around. Then wait 72 hours before washing. Don't bleach.
Boo-Ya! You've just made an Easter shirt!Things I would have done differently :
Gotten a different colored shirt. They didn't have any other than white and I was in a hurry. I wanted blue.
Used brown paint. Totally didn't check if I had brown. So I settled with black.
Watched what I was doing. I was distracted and dropped a drop of black. I never wanted to have to put "Bray" on there. Now people are going to ask why it says "Ouch Bray". Not what I wanted.
But practice makes perfect! Good luck on yours!


